Generative AI Drawing Game
One of the more ambitious projects I’ve worked on recently is a touchscreen-driven drawing game that uses generative AI to both create prompts for the user to draw, and to make their rough drawings on the device look pretty by generating a high quality image based on their drawing input and the prompt.
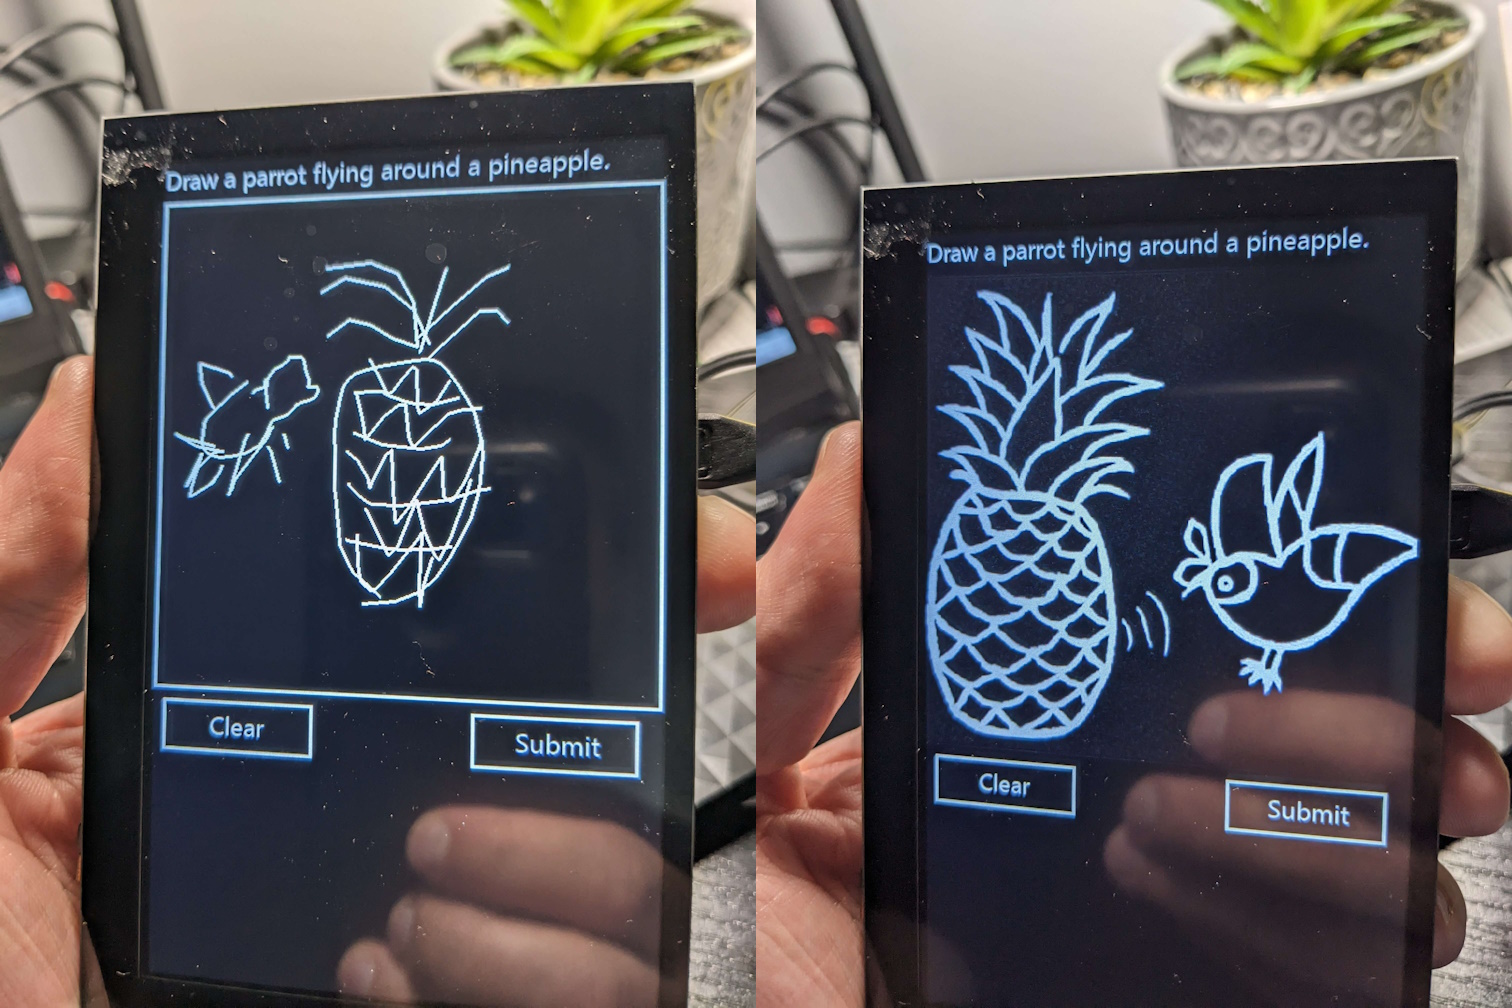
As you can see, I managed to get a working prototype going. You can find the source code for the project here, but we’ll go through it section-by-section to give a breakdown of what the code is doing.
#init
pygame.init()
pygame.mixer.quit()
pygame.mouse.set_visible(0)
size = (pygame.display.Info().current_w, pygame.display.Info().current_h)
screen = pygame.display.set_mode(size, pygame.FULLSCREEN)

canvas = pygame.Rect(40, 0, 480, 480)
clear = pygame.Rect(530,480-150-10,50,150)
submit = pygame.Rect(530,480-150-310,50,150)
new_prompt = pygame.Rect(0, 0, 40, 40)
This project uses pygame, a python library for creating video games (among other things). I used it because I was familiar with the library through my other clock projects. We’re only using the basic geometry and font functionalities of the library, but it gives a quick way to draw shapes and words at whatever position and orientation you need. In this init block, we’re simply setting up the library, turning off the audio, hiding the mouse cursor, and setting up the button and drawing areas.
I’m defining the rectangles here so that I can refer back to them later, in particular when processing touch events to see if someone touched a button or drew on the canvas.
Drawing Prompt Generation
bedrock = boto3.client(service_name='bedrock-runtime')
accept = "application/json"
content_type = "application/json"\
I’m also using the boto3 client here to talk to the Amazon Bedrock Runtime API. This gives us a nice python library we can use to make the HTTP API calls needed to interact with their hosted generative AI models. The credentials are managed through )AWS profiles configured on the computer, so you’ll have to go through that if you want to run locally or deploy to an instance. It has the nice benefit of not having to double-check that my open source repositories have my credential information in them :)
def get_prompt():
    body = json.dumps({
            "inputText": "Generate a drawing prompt in the format
                \"Draw a {animal or occupation} {verb}ing a {noun}\".
                Only return the prompt, and fill in all the blanks. The sentence shouldn't make sense.",
            "textGenerationConfig": {
                "maxTokenCount": 4096,
                "stopSequences": [],
                "temperature": 1,
                "topP": 1
            }
        })
    response = bedrock.invoke_model(
        body=body, modelId="amazon.titan-text-lite-v1", accept=accept, contentType=content_type
    )
    response_body = json.loads(response.get("body").read())
    return response_body['results'][0]['outputText'].strip()

prompt = get_prompt()
Here I’ve created a method to ask the Amazon Titan model to generate a drawing prompt for me, and call that at app startup. I find it a bit hilarious that I had to include The sentence shouldn't make sense in my prompt, but it appeared to work with good results. I wanted the prompts to be a bit wacky so that the drawings would be creative and fun.
You can see how a generative AI request is formed by looking at the json structure. We have inputText (which is pretty standard across all the Amazon-hosted models), some textGenerationConfig which gives us some variables to tweak regarding the generation like tokenCount (the max length of the response - I should have this set to much lower than 4096 as this is roughly 2000 words), temperature (the randomness of the output, 1 is ‘most random’), and topP (the variability of the output, 1 is ‘most variable’). Finally we parse the outputText out of the response json object. I should probably also have some error handling here in case we don’t get a response from the model… but you know, prototype hobby project and all.
# draw area
def setup_draw():
    screen.fill((0,0,0))
    s = pygame.transform.rotate(screen, -90)
    #prompt
    font = pygame.font.Font('segoeui.ttf', 24)
    s.blit(font.render(prompt, True, (255,255,255)), (0, 0))
    #new prompt
    reload_img = pygame.image.load("clockwise-rotation.png")
    s.blit(reload_img, (442,2))
    #pygame.draw.rect(s, (255,255,255), (440,0,40,40), 3)
    #canvas area
    pygame.draw.rect(s, (255, 255, 255), (0, 40, 480, 480), 3)
    #clear
    pygame.draw.rect(s, (255,255,255), (10, 530, 150, 50), 3)
    s.blit(font.render("Clear", True, (255,255,255)), (58, 537))
    #submit
    pygame.draw.rect(s, (255, 255, 255), (310, 530, 150, 50), 3)
    s.blit(font.render("Submit", True, (255, 255,255)), (350, 537))
    #draw to screen
    screen.blit(pygame.transform.rotate(s, 90), (0,0))
    pygame.display.update()
    scren_state = "draw"

setup_draw()
Here we’re drawing the control area for the game. Selecting a font, adding a “regenerate” button image, and filling in the previous rectangles that represent touch buttons with text, and finally drawing to the screen. I also have some rotation code in here - I believe it was to avoid having to figure out how to rotate the text :P
Another concept here is the idea of a “surface”. In most of these methods we’re asking pygame to give us a surface object (in this case, the return value from rotate), and manipulating that surface object before we eventually call screen.blit to draw the contents of that surface object to the screen. This is essentially an in-memory screen we can manipulate as needed, which allows us to make adjustments without updating the display. It operates much faster, and doesn’t introduce any weird UI flickers as portions are updated. The screen object itself is also a surface, bound to the display, and which only gets drawn to the actual device when we call pygame.display.update()
I’m also maintaining a screen_state variable here. The game can be in one of two states, drawing or showing (image). I use this state to change the behavior of the touch controls.
I’m going to skip ahead in the code to the game loop, showing how we process events.
Canvas Drawing
# The game loop
running = True
lastPosition = None
clock = pygame.time.Clock()

while running:
    # Check for events
    for event in pygame.event.get():
        # Check for finger inputs
        if event.type == pygame.FINGERDOWN or event.type == pygame.FINGERMOTION:
            pos = (event.x * size[0], event.y * size[1])
            if clear.collidepoint(pos):
                print("Clearing")
                setup_draw()
            elif submit.collidepoint(pos):
                if screen_state == "draw":
                    print("submitting")
                    submit_pic()
                elif screen_state == "image":
                    print("new image")
                    prompt = get_prompt()
                    setup_draw()
            elif new_prompt.collidepoint(pos):
                print("new prompt")
                prompt = get_prompt()
                setup_draw()
            elif not canvas.collidepoint(pos):
                lastPosition = None
            elif lastPosition is None:
                lastPosition = pos
            else:
                pygame.draw.line(screen, (255,255,255), lastPosition, pos, 3)
                lastPosition = pos
                pygame.display.update()
        elif event.type == pygame.FINGERUP:
            if lastPosition is None:
                continue
            pos = (event.x * size[0], event.y * size[1])
            if canvas.collidepoint(pos):
                pygame.draw.line(screen, (255,255,255), lastPosition, pos, 3)
                pygame.display.update()
            lastPosition = None
First off we’re setting up some variables; a bool to indicate if we’re still running (which keeps the While loop from terminating until we set it to false), and an object to keep track of the lastPosition of a FINGERDOWN event. Then, we ask the pygame event queue for a list of events that have happened since we last checked, processing either FINGERDOWN, FINGERMOTION, or FINGERUP events.
Once we have the event position figured out (it’s expressed in a percentage of X and Y for some reason), we try to figure out if the position occurred inside one of the rectangles we care about - the clear, submit, or new prompt buttons, or the canvas. If it happened within one of the buttons, we call the appropriate method (and I added some print debug statements here). If it happened in the canvas, and we have a last position from a previous event, we draw a line from the last position to the current position and update the display.
It sounds like using this approach we’d get a bunch of polygons, but I’ve found that the game loop operates fast enough that the output is able to mimic the path of the user’s finger quite well. It’s also worth noting that if a user goes outside of the canvas area, we’ll set lastPosition to null, effectively stopping the drawing action.
Side note, you likely want some sort of delay in this loop, otherwise it’ll sit there and spin as fast as it wants. Maybe a sleep of a few milliseconds or whatever rate you want to process touch events at - the longer the sleep, the more of a delay between touch events, meaning the granularity of the lines drawn between touch events may decrease. I can’t remember if I experimented with this or not.
Generating an image
def submit_pic():
    #get image from screen
    s = pygame.transform.rotate(screen, -90)
    simg = s.subsurface(0, 40, 480, 480)
    data = io.BytesIO()
    pygame.image.save(simg, data, 'PNG')
    b64data = base64.b64encode(data.getvalue())
    body = json.dumps({
            "taskType": "IMAGE_VARIATION",
            "imageVariationParams": {
                "text": prompt,
                "images": [b64data.decode('utf-8')]
            },
            "imageGenerationConfig": {
                "numberOfImages": 1,
                "width": 512,
                "height": 512,
                "cfgScale": 8.0
            }
        })
    response = bedrock.invoke_model(
        body=body, modelId='amazon.titan-image-generator-v1', accept=accept,
            contentType=content_type
    )
    response_body = json.loads(response.get("body").read())

    base64_image = response_body.get("images")[0]
    base64_bytes = base64_image.encode('ascii')
    image_bytes = base64.b64decode(base64_bytes)
    output = io.BytesIO(image_bytes)
    newimg = pygame.image.load(output).convert()
    draw_result(newimg)
This part of the code is likely the most interesting. We’re going to use the Amazon Titan Image Generator model to generate an image based off of what the user drew on the screen. The model prompt can take in both a text and image input, indicating that it should use both to generate a new image.
We first crop the user’s drawing from the pygame screen, and save that crop as a PNG in memory, which we then convert into a Base64 array that we can send in with our HTTP request to the hosted model in AWS. We send that Base64 array along with the original prompt that was generated earlier, and a few parameters; we only want one image, sized to 512x512, and a new parameter - cfgScale.
The cfgScale parameter is a scale between 0 and 10, indicating how important the text prompt is compared to the image prompt. With a value of 8, it’s indicating that the image prompt has noticeably more weight than the text prompt. I played around with this value a bit, and landed on 8, since I wanted the resulting image to be recognizably close to what the user originally drew.
Finally, we get a response back in Base64 format from the model, and turn that back into a pygame image we can draw on the screen.
def draw_result(newimg):
    s = pygame.transform.rotate(screen, -90)
    scale = 1 + ((480 - 512) / 512)
    imgscale = pygame.transform.scale(newimg, (int(512 * scale), int(512 * scale)))
    #imgscale = pygame.transform.flip(imgscale, 1, 0)
    s.fill((0,0,0))
    s.blit(imgscale, (0, 40, 480, 480))
    #prompt
    font = pygame.font.Font('segoeui.ttf', 24)
    s.blit(font.render(prompt, True, (255,255,255)), (0, 0))
    #submit
    pygame.draw.rect(s, (255, 255, 255), (310, 530, 150, 50), 3)
    s.blit(font.render("Restart", True, (255, 255,255)), (350, 537))
    #draw to screen
    screen.blit(pygame.transform.rotate(s, 90), (0,0))
    pygame.display.update()
    screen_state = "image"
In the last method, we draw the image we got from the Titan Image Generator model on the screen, and add a ‘restart’ button to take us back to the beginning. I scaled the image to the screen size, mine was a 800x480 screen.
Hopefully this sample code shows how easy it is to make your own games that can take advantage of generative AI!