
Prompt Engineering with Github Copilot
Just like working with any other large language model, prompt engineering is an important part of shaping the input and output of a model to achieve your specific task. When working with generative AI tools, however, the explicit control over the query sent into the model is often abstracted away. But, that doesn’t mean you can’t still shape the input - let’s discuss how to do this with Github Copilot specifically.
When working with generative AI tools, the process is still the same; a chat context is sent to a language model, and the language model generates some output. There’s still system prompts, assistant prompts, and user prompts, just like using any chat-based interface. The main difference is that chat context, and how it’s constructed for you using the various features and execution context of the tool that’s running. So the trick then, is to guide and control how the generative AI tool creates this context. Luckily with something like Github Copilot, how it creates this context is quite well documented, and we can use the tips and tricks to get the best software development support available.
Context Sources
When using Github Copilot, the prompt that is built and sent to the language model consists of not only your user prompt, but a whole bunch of other context. Here’s a non-exhaustive list:
- Open files
- files open in your IDE are often included when answering a question
- Top-level comments
- if your current file has any class or top-level comments, that plain text is included in the prompt context
- Method and Variable Names
- the fact that there’s methods called
CreateCustomer, for example, would be included in a prompt, and the language model could derive its purpose based on its name
- the fact that there’s methods called
- Function comments
- much like the top-level comments, if the function you’re referencing has top-level or inline comments, those can be included
- Highlighted code
- if you’ve explicitly highlighted code when asking Github Copilot a question, the tool with target its specific context to that highlight
- File references
- in addition to the automatic file inclusion, you can explicitly name files you want included in your prompt
- Chat context
- and of course, Github Copilot exists within a chat context, so you can ask follow up questions, maintaining the answer context you’ve constructed
You can already imagine how manipulating these context points may shape the results the language model can generate.
Initiating the Conversation
Of course, there’s multiple ways to engage with Github Copilot in your IDE, and each way can potentially influence the context built.
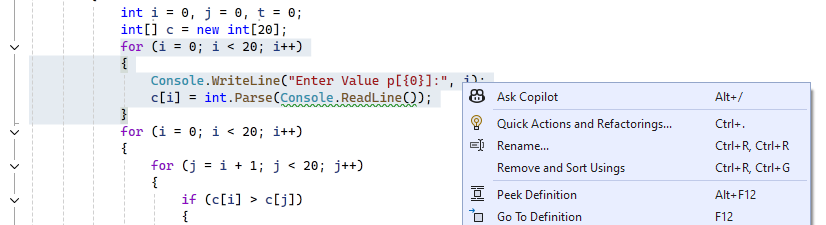
- Highlight & Click
- As already mentioned, highlighting the specific code you’re referring to helps build a more specific prompt, and you can right-click that highlight and “Ask Copilot”
- As already mentioned, highlighting the specific code you’re referring to helps build a more specific prompt, and you can right-click that highlight and “Ask Copilot”
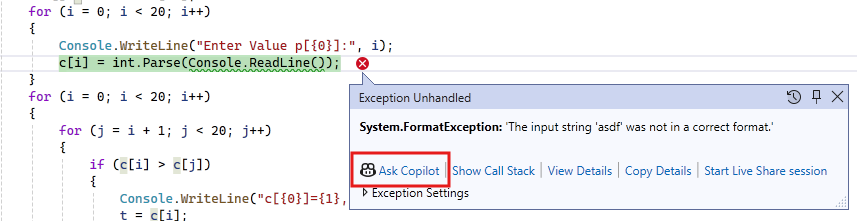
- Explain errors
- When run into an exception while debugging, there is an “Ask Copilot” option, which will include the exception and execution context as part of the prompt
- When run into an exception while debugging, there is an “Ask Copilot” option, which will include the exception and execution context as part of the prompt
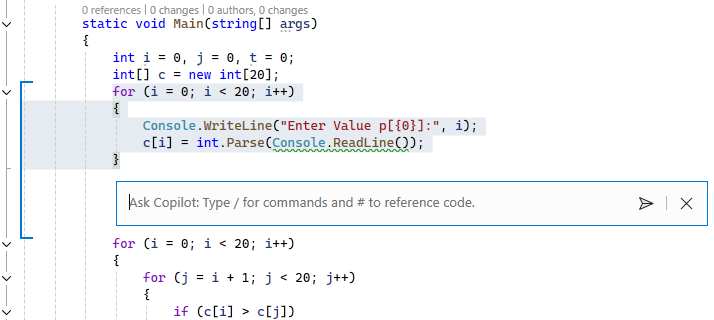
- In-line chat
- If you prefer staying in your working window, you can quickly bring up an inline copilot dialog with
Alt + /, and the context will be around your cursor position. If the conversation gets too detailed, you have the option to move the conversation over to a chat window.
- If you prefer staying in your working window, you can quickly bring up an inline copilot dialog with
- Chat window threads
- Of course you have the in-IDE chat contexts, which (just like other chat tools like ChatGPT) you can create new or reuse existing thread contexts within.
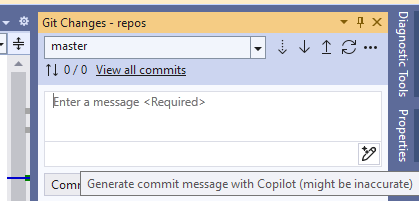
- “Magic Sparkles”
- As you use Github Copilot you may notice “magic sparkle” icons throughout your IDE - those are yet another place where you can take advantage of generative AI, each of which will have their own context to draw from
- As you use Github Copilot you may notice “magic sparkle” icons throughout your IDE - those are yet another place where you can take advantage of generative AI, each of which will have their own context to draw from
Often when working with these various ways of initiating a generative AI session, you’ll be able to see the context that’s being included in the prompt. This is often illustrated with a blue bracket along the left side of your IDE.
Slash Commands
Github Copilot also comes with a handful of “slash commands” which are essentially prompt templates for specific operations. Instead of typing a full fledged natural language query (or in addition to), you can use these slash commands to let Github Copilot know exactly what you’re trying to accomplish.
- /explain
- Ask for an explanation of the code
- /fix
- Generate fixes for potential errors with the code
- /doc
- Create comments (both top-level meta comments as well as inline comments)
- /optimize
- Look for performance or code structure optimizations and suggest them
- /tests
- Generate unit tests
In addition to these slash commands, there’s a number of other shortcuts you can use
- #workspace or #solution
- include a reference to the entire workspace or solution when generating an answer
- #filename
- explicitly include a file in your prompt
- #method
- explicitly include a method in your prompt
- @workspace
- use the Github Copilot “workspace” add-on to include relevent files in the prompt
It’s worth noting that the @ syntax is the way to include other add-on tools in your prompt - a list of tools can be found here, and they include things like Github, Azure, Docker, Stack Overflow, Teams, Atlassian, New Relic, and more. Those “add-ons” allow Github Copilot to pull even more contextual information into the prompt, providing the ability to give a more specific result that is likely relevant to your operation.
General Tips
Of course, a lot of the same general prompt engineering tips that apply to most prompt engineering apply here as well.
- Start general, and then get specific
- Let Github Copilot know what you’re trying to do, and then add specific details like edge cases, input types, error conditions, etc.
- Give examples
- If you have an example date format or text input, including it in your comments or query helps Github Copilot give you a specific result
- Break down complex tasks
- Asking Github Copilot “Make me an app that processes orders online” isn’t going to get you very far - but you could ask it to make a landing page, an “add to cart” button, a sign-up page, a checkout page…
- Follow good coding practices
- As I alluded to in an earlier post, all those good coding practices we’ve been trained to use like consistency, naming conventions, commenting our code, keeping our method sizes down, unit testing, using known patterns and frameworks - all of these things contribute to the clarity that Github Copilot needs to produce accurate and relevant results. If your code already does them you’re a step ahead of a codebase that might be lacking in those areas.
Hopefully with these tips and tricks you’re able to take full advantage of tools like Github Copilot in your software development workflow. Other generative AI tools will have their own tips, so make sure to do some research when incorporating other tools into your flow.